
Initial installation - Windows
The following video shows you all the necessary steps to install the smartWARE evaluation on a Windows operating system.
If you are using a Windows server, you must check it for WSL2 (Windows Subsystem for Linux) support. WSL2 is the prerequisite for the running capability of the smartWARE evaluation on a Windows operating system.
If you prefer to watch videos instead, this is just the thing for you.
Erstinstallation
The software must be installed in the Linux files system of Windows (WSL2)!
Copy the installation file to any directory on your Windows OS
(for example, c:\Temp\smartWARE_452.5.0.0.14.exe).
After launching the executable by double-clicking or in the Windows console (smartWARE_452.5.0.0.14.exe), a Windows Command Shell opens:

Pressing any key starts the installation process.
The installation script starts now and the following output is displayed in the terminal.
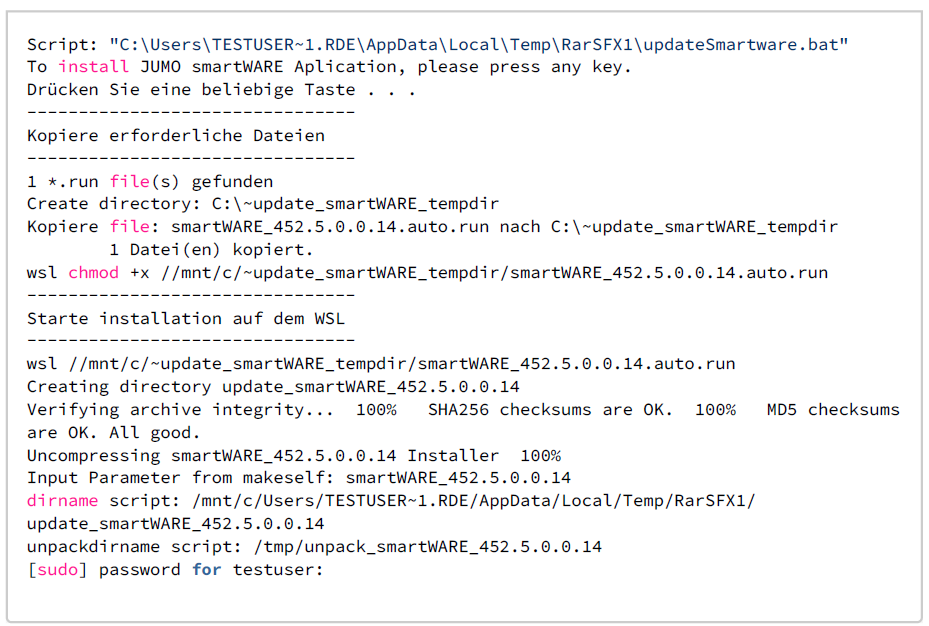
Since root (sudo) privileges are required for the installation, you will be asked for the password. Enter the password you assigned during the WSL Ubuntu installation to start the installation. The required files are unpacked to the /tmp directory and then copied to the target directory ~/smartWARE_452.5.0.0.14. (Note: "~/" is the short form of the user's home directory, "/home/user")
To access the application with the Internet browser via HTTPS, the installation script generates a self-signed certificate. This certificate can be replaced later by an official certificate (if available) (see basic configuration).

The Windows installation completes with any key pressed at the end of the installation process.
All further steps are now performed in the command shell of the Ubuntu (bash).
Now start the Windows Terminal.
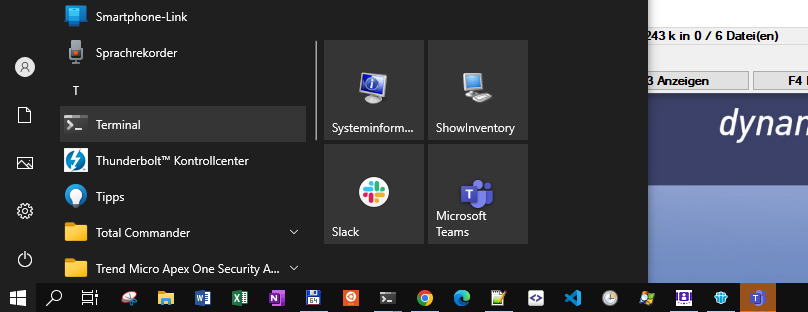
If the terminal is not already installed, the installation of the terminal will be done by the Microsoft
store.

In the search box, type Terminal and select and install Windows Terminal.

Please note that after starting the terminal program a "Windows PowerShell"
opens automatically. However, we need a Linux terminal for installation. For this reason, you now also open a Linux terminal (Ubuntu-20.04):

The script now creates the following new directories on Ubuntu (WSL2):

The directory ~/smartWAREData/ contains all persistent data of the application. This is where all the data that needs to be retained is stored, even after a software update, such as the measured values transferred from the Jupiter devices, user settings such as dashboards or device location information. As a user, "root" rights are required for access.
The directory ~/smartWARE_452.5.0.0.14/ contains all scripts that are needed to run the application. e.g.: start and stop script to start and stop the Docker services. In this directory, individual settings can also be configured and saved in a .env file. More about this in the chapter "Basic configuration".
Basic Configuration
After executing the installation script, the services can be started. The services are then started with the following default settings.
The services are then started with the following default settings.
Default Settings

These settings are saved in the installation directory of the software (~/smartWARE_452.5.0.0.14) in a file named .env. To create or modify this file, the ~/smartWARE_452.5.0.0.14/config_smartware.sh script can be used. The text-based menu navigation allows the parameters to be easily changed.
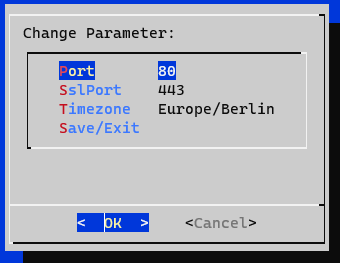
To save the new settings, select Save/Exit.
The generated .env file is saved at ~/smartWARE_452.5.0.0.14/.env.
The changes to the settings will take effect when you next start the system.
~/smartWARE_452.5.0.0.14/stop_smartware.sh
~/smartWARE_452.5.0.0.14/start_smartware.sh
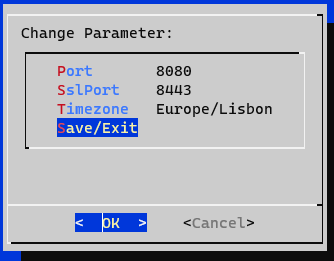
However, this means that the port must be specified in the browser when accessing the GUI. In this case it would be:
http://ip:80802
https://ip:84433
This changed port must then also be set correctly in the Datastore Gateway of the Jupiter devices! In this case, the port for the HTTP protocol would need to be specified. (Note: The HTTPS
protocol in the Jupiter device is only supported as of firmware version 8.x! Installation of the
smartWARE Evaluation software on a cloud computer over the Internet should therefore only be considered with the HTTPS support provided by firmware 8.x.) ip:8080/store4
Replace self-signed certificate
During installation, a self-signed certificate is generated and copied to the directory ~/smartWAREData/reverse_proxy/certs. If you open the software GUI in the browser using the HTTPS protocol, you will get a warning from the browser because the certificate is self-signed. Here is an example for the Chrome browser:
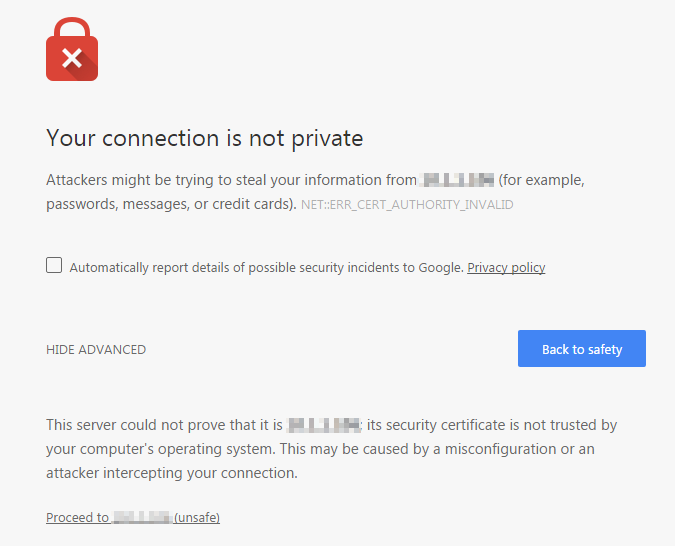
However, you can ignore this warning because the self-signed certificate is not known to the browser. To do this, click the link "continue to... (not secure)". However, you can also prevent the browsers from warning you by using an officially signed certificate or by providing this to the software. ~/smartWAREData/reverse_proxy/certs directory contains 2 files
smartware.crt
smartware.key
These files can only be exchanged as root user (sudo). This certificate and key files can be replaced by the company's own officially signed files. To do this, stop the smartWARE services (see 5.2). Rename the two existing files (e.g. to smartware.ctr_original , smartware.key_original). Then copy the officially signed files and rename them if necessary. Important: The files must have the names smartware.crt and smartware.key and must be in PEM/X509 format.
After replacing the files and starting the smartWARE services (see 5.1), please check the log file to ensure that the replaced files do not cause any problems:
$ cat ~/smartWAREData/reverse_proxy/error.log | moreUpdate installation
The update installation is no different from the initial installation. Chapters 3 and 4 therefore also apply to an update. Existing configuration files (e.g. File .env) will be included in the new installation. The installation script will perform the stop of the old installation and restart the new installation.
Operation
The smartWARE Evaluation software consists of several individual programs (also referred to as microservices). These programs are started as Docker containers. For easy starting and stopping of the services, in the directory:
~/smartWARE_452.3.0.0.7
there are two Linux shell files
start_smartware.sh
stop_smartware.sh
Starting the services
In the Linux console, switch to the directory ~/smartWARE_452.3.0.0.7 and run the script ./start_smartware.sh:
$ ./start_smartware.shIt is necessary to enter the character combination ./ (i.e. a dot followed by a slash), otherwise Linux will not find the file. It tells Linux that the file is in the current directory.
When you call this script for the first time after installation, the software packages (images) are loaded from the JUMO server first. The individual services are then started as Docker containers. You can view the current status of the services by starting another shell script.
$ ./status_smartware.shYou should now see a list showing you the status of each service:
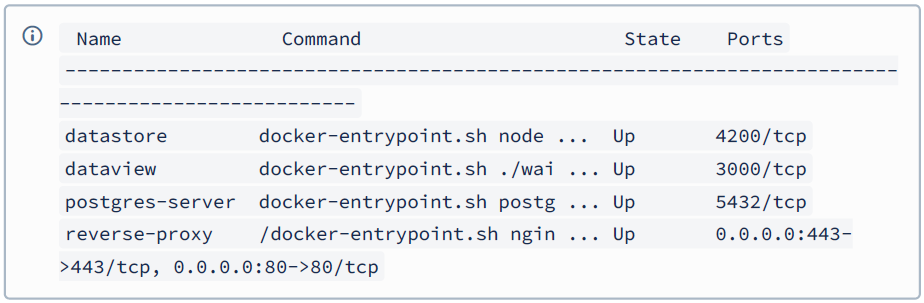
If all services show the state Up, the services are running. You can now open the start page in the browser by clicking http://IP or https://IP.
Where IP stands for the IPv4 address of the W10 PC on which the services were started. However, you can also use the hostname of the computer instead of the IP address or http://localhost, if the browser was started on the same computer. If ports 80/433 are already being used by another program and you have configured alternate ports through entries in the .env file, please append the respective port to the URL, e.g. http://localhost:8080 or https://localhost:8433.
Stopping the services
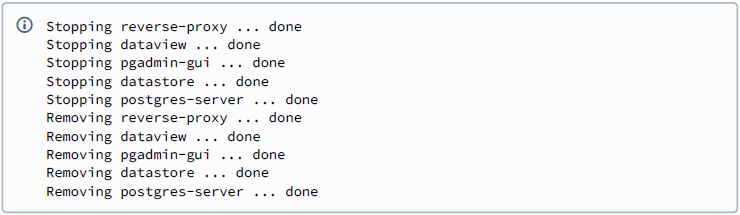
To apply changes to the .env files, it is necessary to close each individual service in an orderly fashion before you can restart them. To do this, call the script ./stop_smartware.sh on the Linux console.
$ ./stop_smartware.shIt takes a few seconds for all services to close. The following output is displayed on the screen:
VHDx Datei
Please always close the smartWARE services as described before making the following changes.
Move
By default, Windows Docker Desktop installs everything on disk C:.
Example: Move the Ubuntu-20.04 VHDx to drive E:.
To move the Ubuntu VHDx file to a second internal, larger SSD, the following steps are required:
As an administrator, open a Windows Powershell and display all distributions:
❯ wsl --list

Windows-Subsystem für Linux-Distributionen:
Ubuntu-20.04 (Standard)
docker-desktop
docker-desktop-data
Moving the distribution involves the following steps.
The distribution is exported to a .tar file on the SSD E:.
The distribution is logged off.
The exported distribution is imported from the .tar file on the new SSD E:.
After the import has been successfully completed, the .tar file can be deleted.
wsl --export Ubuntu-20.04 E:\ubuntu.tar
wsl --unregister Ubuntu-20.04
Registrierung wird aufgehoben…
wsl --import Ubuntu-20.04 E:\Docker\wsl\Ubuntu-20.04\ E:\ubuntu.tar --version 2
This moves the Ubuntu distribution to drive E:\Docker\wsl\Ubuntu-20.04\. To test, open an Ubuntu shell and check. If everything is ok, the file E:\ubuntu.tar can be deleted.
If you want the "root" user to be the default user after starting, do the following:
The default user must be entered in the file /etc/wsl.conf:
[user]default=enter_my_default_username_here.
Then you need to run "wsl --shutdown" in the Powershell to activate the change.
Increase maximum size
The WSL 2-VHDx uses the Ext4 file system. This VHDx is automatically adjusted to its storage requirements and has an initial maximum size of 256 GB. If the space required by the Linux files exceeds this size, it may be necessary to expand it. If the distribution grows beyond the size of 256 GB, errors are displayed, stating that there is no more storage space available. This error can be fixed by increasing the size of the VHDx, provided that the physical disk is also large enough. The following example refers to an Ubuntu distribution vhdx that was already moved to another drive (E:)! In this case the size is increased from 256GB to 356GB.
maximum=356000
Open a Powershell:
PS C:\WINDOWS\system32> wsl --shutdown
PS C:\WINDOWS\system32> diskpart
Microsoft DiskPart-Version 10.0.19041.610
Copyright (C) Microsoft Corporation.
On computer: EW-TEST
DISKPART> Select vdisk file="E:\Docker\wsl\Ubuntu-20.04\ext4.vhdx"
The file for virtual data media was successfully selected by DiskPart.

DISKPART> detail vdisk
Geträtetyp-ID: 0 (Unbekannt)
Hersteller-ID: {00000000-0000-0000-0000-000000000000} (Unbekannt)
Status: Hinzugefügt
Virtuelle Größe: 256 GB
Physische Größe: 27 GB
Dateiname: E:\Docker\wsl\Ubuntu-20.04\ext4.vhdx
Ist untergeordnet: Nein
Übergeordneter Dateiname:
Zugeordnete Datenträgernummer: Nicht gefunden.

DISKPART> expand vdisk maximum=356000
100 Prozent bearbeitet
Die Datei für virtuelle Datenträger wurde von DiskPart erfolgreich expandiert.
DISKPART> exit
Now start the Ubuntu distribution and switch to the Linux shell:
df -h
Filesystem  Size  Used  Avail   Use%  Mounted on
/dev/sdb    251G  28G   211G    12%   /
tmpfs       3.1G  0     3.1G    0%    /mnt/wsl
tools       454G  273G  182G    61%   /init
none        3.1G  0     3.1G    0%    /dev
none        3.1G  4.0K  3.1G    1%    /run
none        3.1G  0     3.1G    0%    /run/lock
none        3.1G  0     3.1G    0%    /run/shm
none        3.1G  0     3.1G    0%    /run/user
tmpfs       3.1G  0     3.1G    0%    /sys/fs/cgroup
C:\         454G  273G  182G    61%   /mnt/c
E:\         466G  109G  358G    24%   /mnt/e

sudo resize2fs /dev/sdb 356000M

[sudo] password for user:
resize2fs 1.45.5 (07-Jan-2020)
Filesystem at /dev/sdb is mounted on /; on-line resizing required
old_desc_blocks = 32, new_desc_blocks = 44
The filesystem on /dev/sdb is now 91136000 (4k) blocks long.

df -h
Filesystem  Size  Used  Avail   Use%  Mounted on
/dev/sdb    342G  28G   298G    9%    /
tmpfs       3.1G  0     3.1G    0%    /mnt/wsl
tools       454G  273G  182G    61%   /init
none        3.1G  0     3.1G    0%    /dev
none        3.1G  8.0K  3.1G    1%    /run
none        3.1G  0     3.1G    0%    /run/lock
none        3.1G  0     3.1G    0%    /run/shm
none        3.1G  0     3.1G    0%    /run/user
tmpfs       3.1G  0     3.1G    0%    /sys/fs/cgroup
C:\         454G  273G  182G    61%   /mnt/c
E:\         466G  109G  358G    24%   /mnt/e
Background information
Begriffserklärung
Docker: Stores programs and their dependencies in images. These form the basis for virtualized containers that can run on almost any operating system. This makes applications portable and uncomplicated.
Docker Desktop: Docker Desktop is an easy-to-install application for a Windows environment that can be used to build and share containerized applications and microservices. Docker Desktop includes Docker Engine, Docker CLI client, Docker Compose, Docker Content Trust, Kubernetes and Credential Helper.
Docker Compose: Docker Compose is a tool designed to define and enable multicontainer applications. Compose can be used to define services, which can then be started or stopped with a single command.
Docker Image: You may be familiar with the term "image" in the context of virtualization in relation to virtual machines (VMs). Typically, a VM image is a copy of an operating system. If necessary, a VM image contains other installed components such as database and web server. The term comes from a time when software was distributed on optical media such as CD-ROMs and DVDs. If a local copy of the data medium was required, special software was used to create an image. Container virtualization is the logical next step in the development of VM virtualization. Instead of virtualizing a virtual computer (machine) with its own operating system, a Docker image typically includes only one application. This can be a single binary file or a composite of several software components.
Docker Container: Over the last decade, the Docker virtualization solution has fundamentally changed how software is built, distributed and operated. Unlike the previously established virtual machines (VM), Docker virtualizes individual applications. A Docker container, therefore, is an application or software container. The term software container is adapted from physical containers such as those used on ships. In logistics, containers as standardized units made modern retail chains possible in the beginning. Thus, a container can be transported on any ship, truck or train designed for this purpose. This operates almost independently of the contents of the container. On the outside, the container is equipped with standardized interfaces. This is quite similar to the situation with Docker containers.
VHDx file: In a VHDx file, the contents of a complete hard disk can be stored virtually in the form of a single file. The file format is an extension of the VHD format and was first released with Windows 8 and Windows Server 2012. It offers numerous improvements and functional enhancements compared to the VHD format.
Software Struktur
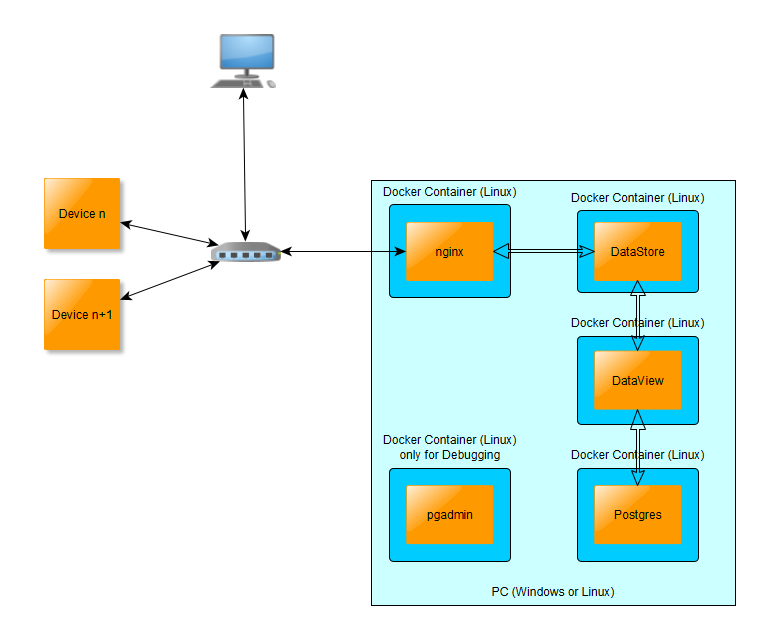
The smartWARE Evaluation software consists essentially of 4 functional units (services):
Datastore
Stores the original data (Cold Data) sent by the Jupiter devices at intervals.Dataview
Prepares parts of the data (Cold Data) and stores them in the Postgres database (Warm Data). Receives user input from the browser application and provides the data to display the dashboard graphs/tables.Postgres database
This is where the so-called Warm Data is stored, i.e. the portion of the data that is used for quick display in the dashboards.Nginx (Reverse Proxy)
The http(s) interface of the services.
These services are developed as Linux Docker containers and are configured and started/stopped using Docker Compose. The data is displayed to the user via a web browser on any computer in the network.
Persistent data
All recorded data is persistently stored by the Datastore service in the Linux user's home directory:
~/smartWAREData/datastore
The data is stored in packed files, and protected from tampering by additional signed files. This entire data set is also referred to as Cold Data.
Deleting this directory or individual files from this directory will result in the loss of the recorded data unless a copy of the data was made!
Backup
This function is only available with version 3.0.0.7.
If datastore Backup is enabled, the data from the datastore is also stored in the directory on receipt.
~/smartWAREBackup/
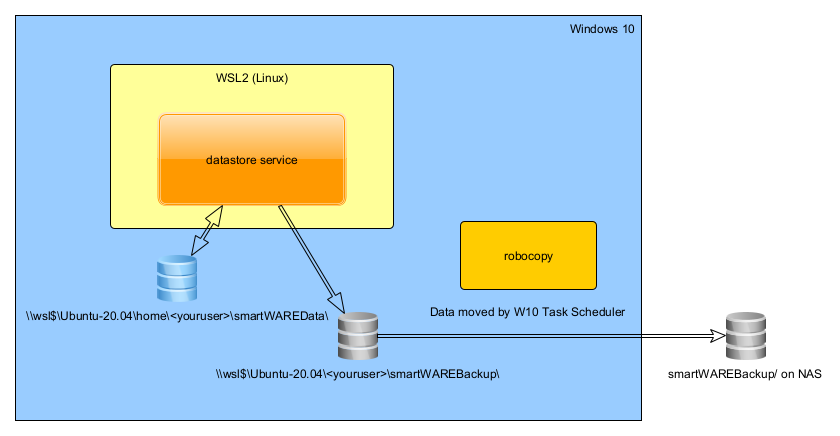
To minimize the likelihood of data loss due to a hard drive crash, it is recommended that you move data from this directory to a NAS on the network on a regular basis. Windows 10 Task Scheduler in conjunction with robocopy is suitable for this purpose.
In a Windows Powershell you can now use the following command to move the files from the directory \wsl$\Ubuntu-20.04\home<youruser>\smartWAREBackup, for example to a fast USB disk (e.g. D:)
robocopy \wsl$\Ubuntu-20.04\home<youruser>\smartWAREBackup D:
\backup_smartware_data /MOV /E
The files are always moved. The \wsl$\Ubuntu-20.04\home<youruser>\smartWAREBackup directory is therefore only a temporary cache of the backup data.
Please make sure to replace <youruser> with the name set on your system, and also change the drive letter of the target drive (in the example D:\ ) to your real system.
The call to robocopy follows the following schema.
robocopy source directory target directory /MOV /
EDer parameter /MOV moves files and deletes them from the source after they have been copied.
The /E parameter copies subdirectories. This option automatically includes empty directories.
You can use the /L parameter to simulate the command. The files are not copied or deleted.
Backup automatisieren
To avoid always having to start robocopy manually, you can also automate the process on a daily basis using Windows Task Scheduler.
To do this, open the "Task Scheduler" program.
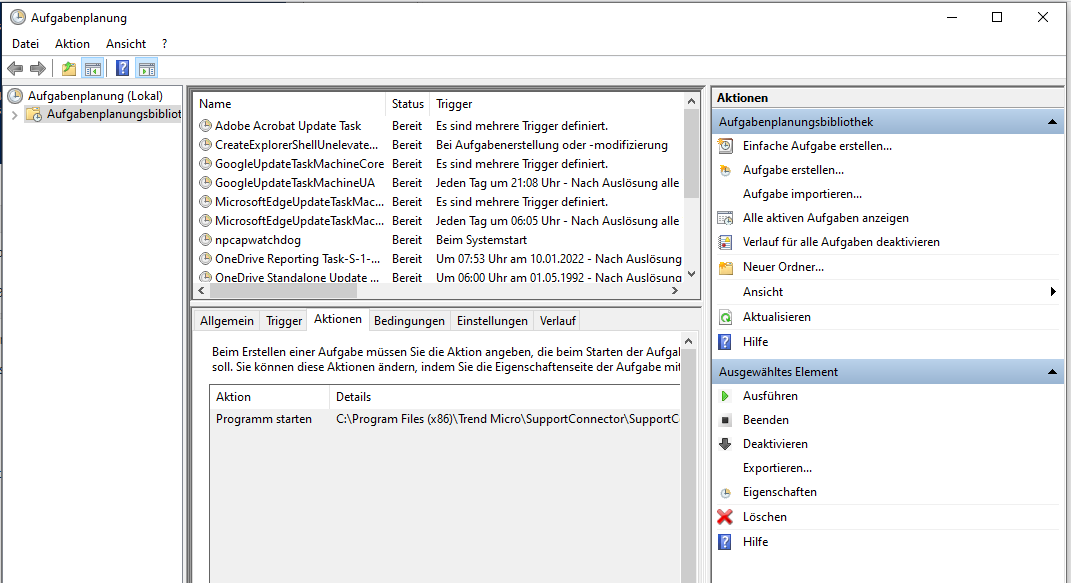
In the Actions section, click "Create simple task...".
A wizard opens, in which you need to enter a name and a description:

Then click the button "Next >".

For example, select "Daily" and then click "Next >".

In this dialog, select the date and time when the backup is to start for the first time and then click "Next >".
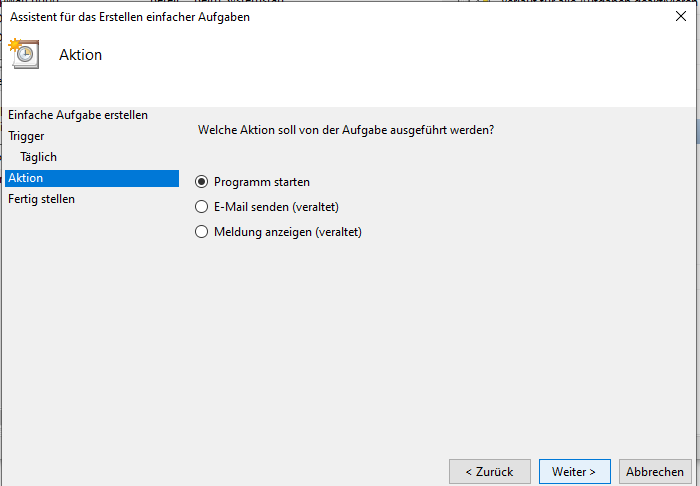
If "Start program" was selected, click "Next >".

In the field "Programs/Script", please enter "robocopy" and in the field "Add arguments (optional)", enter the following long parameter text, which of course needs to be changed to your user name and the correct destination drive letter:
\\wsl$\Ubuntu-20.04\home\<youruser>\smartWAREBackup D:\backup_smartware_data /MOV /EThen click "Next >".

Click "Finish".
You can now also start the task directly to check that the data is also copied to the destination drive.