
Requirements
-
Docker (Version >= 20.10.5) and Docker Compose (version >= 1.28.5) must be installed.
-
The Linux user used for the installation must belong to the Docker group. This can be checked with the command id -Gn userName. When doing so, replace userName with the corresponding user name.
-
The Linux user must also belong to the sudo group, since root permissions are required.
-
The computer requires Internet access for the installation.
-
The TCP ports 80 and 443 on the computer must not be in use (if they are in use, the ports must be changed in the smartWARE Evaluation before starting).
Amount of data generated
What amounts of data are generated when operating the smartWARE Evaluation software? The amount of data generated is determined by 3 main factors:
-
Recording rate (how often a measured value is recorded)
-
Number of channels
-
Recording period
Amount of data [MByte] = number of channels * number of days * 0.725MB * recording rate (in number per second)
Sample table for 240 channels/sec:
|
Period |
Channels |
Recording rate |
Amount of data on the SSD (HDD) |
|---|---|---|---|
|
1 day |
240 |
1/sec |
~ 174 MByte |
|
1 month |
240 |
1/sec |
~ 5 GByte |
|
1 year |
240 |
1/sec |
~63 GByte |
|
5 years |
240 |
1/sec |
~ 314 GByte |
|
10 years |
240 |
1/sec |
~627 GByte |
Performance
Since, depending on the amount of data, the application works with a great deal of data and files, it makes sense to use only computers with SSD and a fast network connection. These system requirements must also be met. A high-performance virtual machine can also be used.
Datastore backup
All recorded data sent from Varitron systems is stored in the Datastore. A regular data backup in the Datastore is used to protect this data from data loss (e.g. in case of a disk crash on the Datastore system). If data backup is activated, the data is also stored in a backup directory when the data is added to the Datastore system. Two different data backup concepts can be used:
-
Backup with intermediate directory
-
Backup with network drive
Backup with intermediate directory
The backup directory is used as an intermediate directory mapped to the same Linux partition as the Datastore system. The files are cached by the Datastore system in the backup directory.
At the same time, the operator's backup software moves the files from the backup directory to a backup destination directory. After this process, the intermediate directory is empty. The backup destination directory should be located on a different data medium than the Datastore system. This can be a slow medium, network drive, NAS, online storage, or external HD. The operator can determine the time and frequency of the backup from the intermediate backup directory. The data in the intermediate directory are disconnected from the application. This means that files can be moved from this directory at any time. Short intervals reduce the risk of data loss. We recommend using this variant.
Backup with network drive
The backup directory is mapped to a drive located on a data medium other than the Datastore system (network drive). The operator must ensure the security of the data on the backup directory. Since access to these network drives is very slow, we do not recommend this solution.
JUMO smartWARE Evaluation backup
All configurations in the smartWARE Evaluation can be secured with a data backup. This contains, among other things, the system/device overview, defined evaluation time ranges, dashboards, evaluation settings, and batch filters. A regular data backup is used to prevent the loss of this data (e.g. in case of a disk crash on the Datastore system). If data backup is activated, the data is stored in a backup directory, e.g. daily at a defined time. The backup directory can be handled in the same way as the Datastore backup.
Cold or Warm data are NOT included in this backup.
Archives
All recorded data sent from Varitron systems is stored in the Datastore. To save storage space on the Datastore system, data that is no longer needed for current evaluations can be archived. When archiving, the data is copied to a defined directory and deleted from the Datastore. The archiving directory should be located on a different data medium than the Datastore system. If the archived data is required for an evaluation, it can be made available again in the Datastore as Cold Data. In this case, the data must be located in the specified archiving directory.
Initial installation
Copy the installation script smartWARE_452.2.0.12.run to the Linux Home directory.
chmod +x ./smartWARE_452.2.0.0.12.run
./smartWARE_452.2.0.0.12.run
The installation script now starts and the following output is displayed in the terminal.
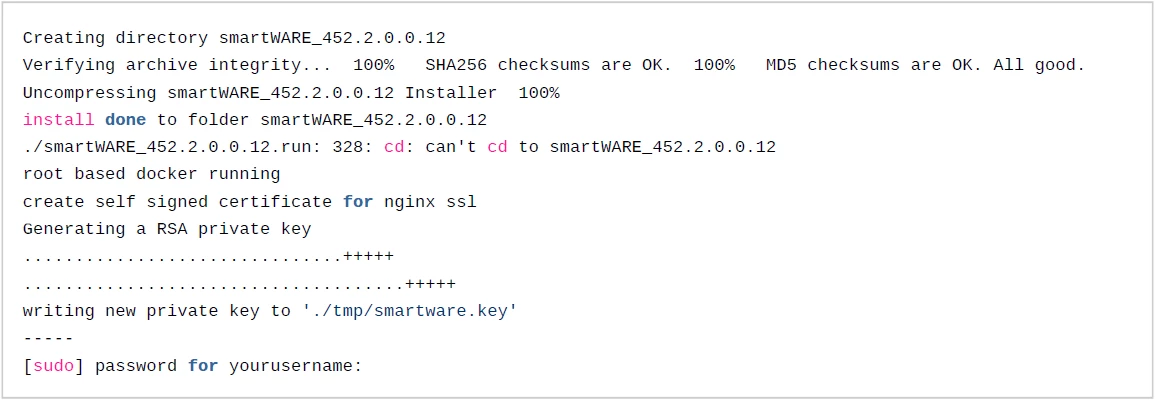
Since root (sudo) privileges are required for the installation, you will be asked for the password. Enter the password to complete the installation. To access the application with the Internet browser via HTTPS, the installation script generates a so-called self-signed certificate. This certificate can be replaced later by an official certificate (if available) (see basic configuration).

The script now creates the following new directories:

The directory ~/smartWAREData/ contains all persistent data of the application. This is where all the data that needs to be retained is stored, even after a software update, such as the measured values transferred from the Jupiter devices, user settings such as dashboards or device location information. Rights to sudo as a user are required for access. The directory ~/smartWARE_452.2.0.12/ contains all scripts that are needed to run the application. e.g.: start and stop script to start and stop the Docker services. In this directory, individual settings can also be configured and saved in a .env file. More about this in the chapter Basic configuration.
Basic configuration
After running the installation script, the services can be started in principle. The services are then started with the following default settings.

Each of these default settings can be overwritten and customized. For this purpose, a file with the name .env must be created in the installation directory of the software (~/smartWARE_452.2.0.12). Switch to the directory for the installation in the Linux console:
cd ~/smartWARE_452.2.0.0.12
touch .env
Start the Nano Editor with the following command:
nano .env
Now enter the parameters you want to overwrite in the .env file and save the file with Ctrl-O and 'Enter'. Exit the Nano Editor with CTRL-X. Here is an example of the content in case you need to change the proxy ports, since they may already be used by another application.

Set time zone
The default time zone setting is DC_TIMEZONE=Europe/Berlin
If the software is operated in another time zone, this setting must be overwritten.
You can find a list of possible time zones here https://en.wikipedia.org/wiki/List_of_tz_database_time_zones
Set up ports
The default setting of the proxy ports is:

This means that the software GUI can be reached via browser using the following URLs:
http://ip
https://ip
It is not necessary to specify the port in this case, because the browsers automatically add port 80 or port 443 for HTTPS, without this being displayed. If the standard ports on the computer to be installed are already in use, the smartWARE Evaluation can be run on any other free ports. To do this, the ports in the .env file must be overwritten. Here is an example:

However, this means that the port must also be specified in the browser when accessing the GUI. In this case it would be:
http://ip:8080
https://ip:8443
This changed port must then also be set correctly in the Datastore Gateway of the Jupiter devices! In this case, the port for the HTTP protocol would need to be specified. (Note: The HTTPS protocol in the Jupiter device is only supported as of firmware version 7.x! Installation of the smartWARE Evaluation software on a cloud computer over the Internet should therefore only be considered with the HTTPS support provided by firmware 7.x.)
ip:8080/store
Replace self-signed certificate
During installation, a self-signed certificate is generated and copied to the directory ~/smartWAREData/reverse_proxy/certs. If you open the software GUI in the browser using the HTTPS protocol, you will get a warning from the browser because the certificate is self-signed. Here is an example for the Chrome browser:
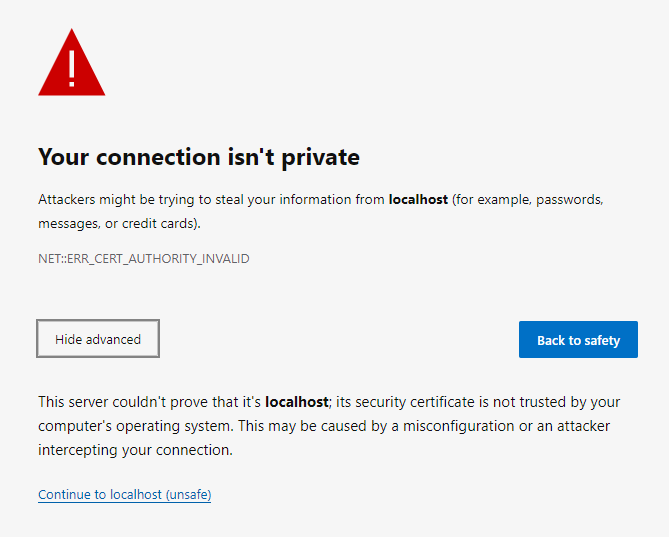
However, you can ignore this warning because the self-signed certificate is not known to the browser. To do this, click the link "continue to... (not secure)". However, you can also prevent the browsers from warning you by using an officially signed certificate or by providing this to the software. There are 2 files in the directory ~/smartWAREData/reverse_proxy/certs
smartware.crt
smartware.key
These files can only be exchanged as root user (sudo). This certificate and key files can be replaced by the company's own officially signed files. To do this, stop the smartWARE services (see 5.2). Rename the two existing files (e.g. to smartware.ctr_original , smartware.key_original). Then copy the officially signed files and rename them if necessary. Important: The files must have the names smartware.crt and smartware.key and must be in PEM/X509 format.
After replacing the files and starting the smartWARE services (see 5.1), please check the log file to ensure that the replaced files do not cause any problems:
$ cat ~/smartWAREData/reverse_proxy/error.log | more
Datastore backup
By default, backup is not enabled because it needs to be configured first. The .env configuration file must be adapted for this purpose:
|
Parameter |
Possible values |
Remark |
|
DC_STORE_BACKUP_FOLDER |
|
Backup directory where the files to be backed up are stored |
|
DC_STORE_RESTORE_FOLDER |
|
Restore directory where the files are read for restoration |
|
DC_BACKUP_USER_ID |
|
User Id in the Linux system, which is used for the files in the backup directory |
|
DC_BACKUP_GROUP_ID |
|
Group Id in the Linux system, which is used for the files in the backup directory |
The recorded data is persistently stored in the following directory.
Here is an example for Ubuntu20.04 and a user "username".
In a Powershell terminal, you can now backup the files with the following command, for example to a fast USB disk (e.g. D:\)
|
In this case, the files that have not yet been saved on the destination drive are always copied.
Please make sure to replace "username" with the name set on your system, and also change the drive letter of the target drive (in the example D:\ ) to your real system.
robocopy is called according to the following sequence.
robocopy source directory destination directory /MIR
the parameter /XF <filename>[ ...] excludes files corresponding to the specified names or paths
the parameter /XD <directory>[ ...] excludes directories corresponding to the specified names and paths.
This means that the file
\\wsl$\Ubuntu-20.04\home\username\smartWAREData\datastore\database.sqlite3
and the directories
\wsl$\Ubuntu-20.04\home\username\smartWAREData\postgresql
\\wsl$\Ubuntu-20.04\home\username\smartWAREData\reverse_proxy
are not backed up to the destination drive. (This is also not necessary!)
Automate backup
To avoid always having to start robocopy manually, you can also automate the process on a daily basis using Windows Task Scheduler.
To do this, open the "Task Scheduler" program.
In the "Actions" section, click "Create simple task..."..
A wizard opens, in which you need to enter a name and a description:
Then click the button "Next >".
For example, select "Daily" and then click "Next >".
In this dialog, select the date and time when the backup is to start for the first time and then click "Next >".
If "Start program" was selected, click "Next >".
In the field "Programs/Script", please enter "robocopy" and in the field "Add arguments (optional)", enter the following long parameter text, which of course needs to be changed to your user name and the correct destination drive letter:
|
Then click "Next >".
Click "Finish".
You can now also start the task directly to check that the data is also copied to the destination drive.
JUMO smartWARE Evaluation backup
By default, backup is not enabled because it needs to be configured first. The .env configuration file must be adapted for this purpose:
|
Parameter |
Possible values |
Remark |
|
DC_VIEW_BACKUP_FOLDER |
|
Backup directory where the files to be backed up are stored |
|
DC_BACKUP_USER_ID |
|
User Id in the Linux system, which is used for the files in the backup directory |
|
DC_BACKUP_GROUP_ID |
|
Group Id in the Linux system, which is used for the files in the backup directory |
|
DC_VIEW_BACKUP_ACTIVE |
true false |
true activates the data backup |
|
DC_VIEW_BACKUP_EVERY_DAY_AT |
|
cron entry to define when the backup is to be started, e.g.
|
Example of a .env file:
DC_VIEW_BACKUP_FOLDER="~/smartWAREBackup/dataview"

// use the first defined user in the Linux system
DC_BACKUP_USER_ID="1000"
DC_BACKUP_GROUP_ID="1000"

DC_VIEW_BACKUP_ACTIVE="true"

// start data backup every day at 04:00 UTC
DC_VIEW_BACKUP_EVERY_DAY_AT="0 04 * * *"
After modifying the .env file, the system must be restarted for the entries to be used.
Set archiving directory and time
By default, archiving is not enabled because it needs to be configured first. The .env configuration file must be adapted for this purpose:
|
Parameter |
Possible values |
Remark |
|
DC_STORE_ARCHIVE_FOLDER |
|
Archiving directory |
|
DC_STORE_ARCHIVE_EVERY_DAY_AT |
|
cron entry to define when the archiving is to be started, e.g. "0 04*". |
|
DC_STORE_ARCHIVE_TYPE |
YEARS, MONTHS, WEEKS, DAYS |
Defines which data is to be archived during an archiving run:
|
|
DC_STORE_ARCHIVE_QUANTITY |
integer > 0 |
see above |
|
DC_STORE_ARCHIVE_UNLOCK_HOURS |
integer > 0 |
defines the period in number of hours after which the restored Cold Data will again be automatically deleted. |
Sample file:
DC_STORE_ARCHIVE_FOLDER="~/smartWAREArchive/datastore"

// start archiving every day at 04:00 UTC
DC_STORE_ARCHIVE_EVERY_DAY_AT="0 04 * * *"

// archive all data older than 6 weeks
DC_STORE_ARCHIVE_TYPE=WEEKS

DC_STORE_ARCHIVE_QUANTITY=6

// after 48 hours restored cold data is automatically deleted
DC_STORE_ARCHIVE_UNLOCK_HOURS=48
Activate change to the .env file
Changes to the .env file only become active when the services are stopped and then restarted. To do this, first start the script ./stop_smartware.sh and then the script ./start_smartware.sh. Then please use the script ./status_smartware.sh to check whether all services started properly. If a service did not start, checking the log or error files of the respective service may help.
|
Service name |
Path for log/error files |
|
datastore |
~/smartWAREData/datastore/logs |
|
dataview |
~/smartWAREData/dataview/logs |
|
reverse-proxy |
~/smartWAREData/reverse_proxy |
The log and error files can be opened with the Nano Editor, for example.
Updateinstallation
In the following description, as an example, the release version 452.2.0.0.12 is installed/active and an update to version 452.3.0.0.7 is to be performed.
The following steps are necessary for an update installation:
-
Stopping the old installed version
-
Copying the new installation script
-
Make the new installation script executable
-
Starting the new installation script
-
Copy the old .env file, if it exists
-
Starting the new version.
-
Deleting the old version.
Stopping the old installed version
Change to the directory of the old version
cd ~ /smartWARE_452 .2.0.0.12/
Stopping the old version, by calling the ./stop_smartware.sh script
. /stop_smartware .sh
Copy the new installation script
Change back to the home directory of the user
cd ~
Copy the new installation script smartWARE_452.3.0.7.run to the user's home directory.
Starting the new installation script
Before the installation script can be started, the file must be made executable.
chmod +x . /smartWARE_452 .3.0.0.7.run
Starting the new installation script
. /smartWARE_452 .3.0.0.7.run
Now the installation script will start and you will see the following output in the terminal.
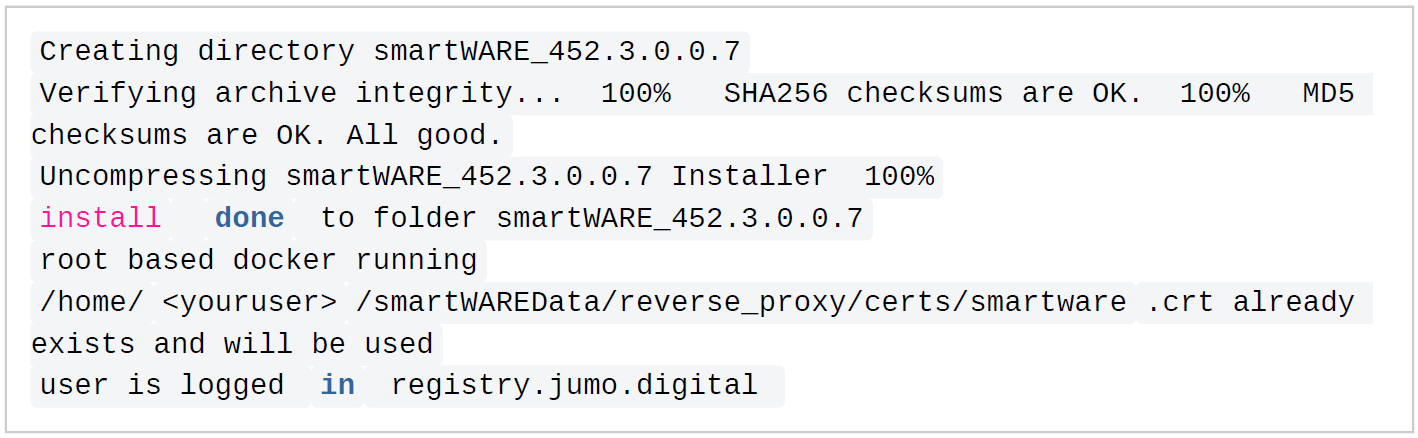
The following directory has now been recreated by the script:
~ /smartWARE_452 .3.0.0.7/
The directory ~/smartWARE_452.3.0.0.7/ contains all scripts necessary to run the application. E.G.: Start and Stop script to start and stop Docker services respectively. In this directory, individual settings can also be configured and saved in an .env file. More about this under the Basic Configuration chapter.
Copying the old .env file, if available
If an .env file was created for the old installation, this file must now be copied to the newly created directory.
This is important, so that individual adjustments are taken over for the new installation.
cp ~ /smarWARE_452 .2.0.0.12/. env ~ /smartWARE_452 .3.0.0.7/. env
Starting the new version
Change to the newly created directory ~/smartWARE_452.3.0.5/ and start the script ./
start_smartware.sh.
cd ~ /smartWARE_452 .3.0.0.7/
. /start_smartware .sh
Deleting the old version
The old installation directory ~/smartWARE_452.2.0.12/ and the old installation script ~/
smartWARE_452.2.0.12.run can now be deleted.
rm -r ~ /smartWARE_452 .2.0.0.12/
rm ~ /smartWARE_452 .2.0.0.12.run
Operation
The smartWARE Evaluation software consists of several individual programs (also referred to as microservices). These programs are started as Docker containers. For easy starting and stopping of the services, in the directory:
~/smartWARE_452.2.0.0.12
there are two Linux shell files
start_smartware.sh
stop_smartware.sh
Starting the services
In the Linux console, switch to the directory ~/smartWARE_452.2.0.0.12 and run the script ./start_smartware.sh:
$ ./start_smartware.sh
It is necessary to enter the character combination ./ (i.e. a dot followed by a slash), otherwise Linux will not find the file. It tells Linux that the file is in the current directory.
When you call this script for the first time after installation, the software packages (images) are loaded from the JUMO server first. The individual services are then started as Docker containers. You can view the current status of the services by starting another shell script:
$ ./status_smartware.sh
You should now see a list showing you the status of each service:
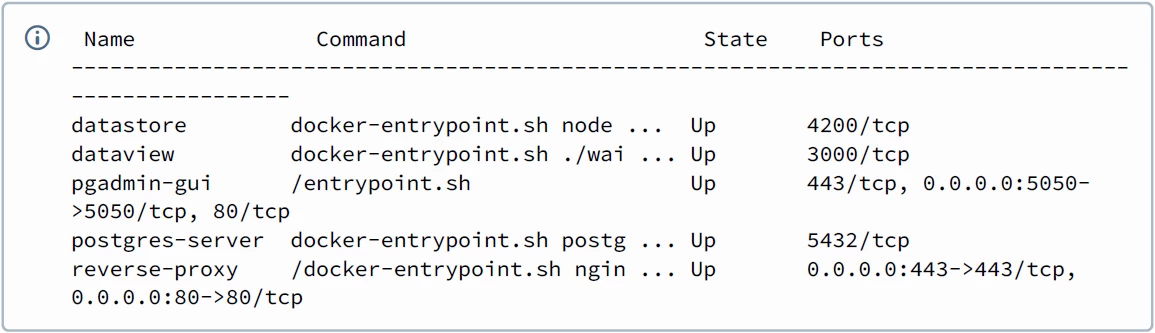
If all services show the state Up, the services are running. You can now open the start page in the browser by clicking http://IP or https://IP. Where IP stands for the IPv4 address of the W10 PC on which the services were started. However, you can also use the hostname of the computer instead of the IP address or http://localhost, if the browser was started on the same computer.
If ports 80/433 are already being used by another program and you have configured alternate ports through entries in the .env file, please append the respective port to the URL, e.g. http://localhost:8080 or https://localhost:8433..
Stopping the services
To apply changes to the .env files, it is necessary to close each individual service in an orderly fashion before you can restart them. To do this, call the script ./stop_smartware.sh on the Linux console.
$ ./stop_smartware.sh
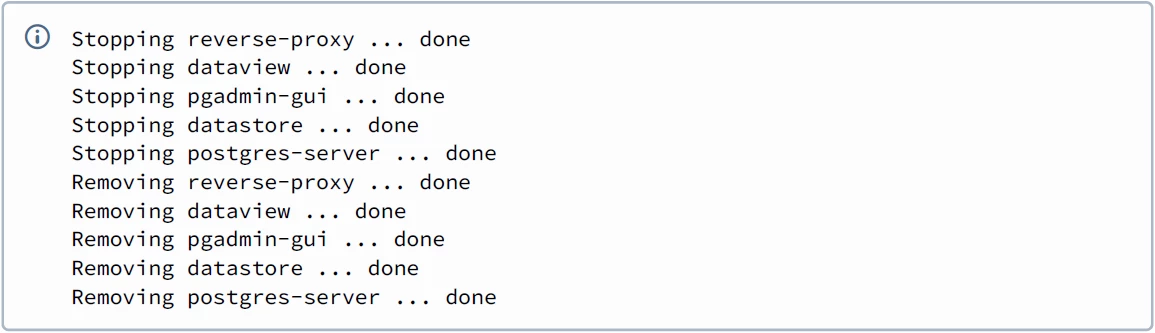
It takes a few seconds for all services to close. The following output is displayed on the screen:
Background information
Explanation of terms
-
Docker: Stores programs and their dependencies in images. These form the basis for virtualized containers that can run on almost any operating system. This makes applications portable and uncomplicated.
-
Docker Desktop: Docker Desktop is an easy-to-install application for a Windows environment that can be used to build and share containerized applications and microservices. Docker Desktop includes Docker Engine, Docker CLI client, Docker Compose, Docker Content Trust, Kubernetes and Credential Helper.
-
Docker Compose: Is a tool designed to define and enable multicontainer applications. Compose can be used to define services, which can then be started or stopped with a single command.
-
Docker Image: You may be familiar with the term "image" in the context of virtualization in relation to virtual machines (VMs). Typically, a VM image is a copy of an operating system. If necessary, a VM image contains other installed components such as database and web server. The term comes from a time when software was distributed on optical media such as CD-ROMs and DVDs. If a local copy of the data medium was required, special software was used to create an image. Container virtualization is the logical next step in the development of VM virtualization. Instead of virtualizing a virtual computer (machine) with its own operating system, a Docker image typically includes only one application. This can be a single binary file or a composite of several software components.
-
Docker Container: Over the last decade, the Docker virtualization solution has fundamentally changed how software is built, distributed and operated. Unlike the previously established virtual machines (VM), Docker virtualizes individual applications. A Docker container, therefore, is an application or software container. The term software container is adapted from physical containers such as those used on ships. In logistics, containers as standardized units made modern retail chains possible in the beginning. Thus, a container can be transported on any ship, truck or train designed for this purpose. This operates almost independently of the contents of the container. On the outside, the container is equipped with standardized interfaces. This is quite similar to the situation with Docker containers.
-
VHDx file: In a VHDx file, the contents of a complete hard disk can be stored virtually in the form of a single file. The file format is an extension of the VHD format and was first released with Windows 8 and Windows Server 2012. It offers numerous improvements and functional enhancements compared to the VHD format.
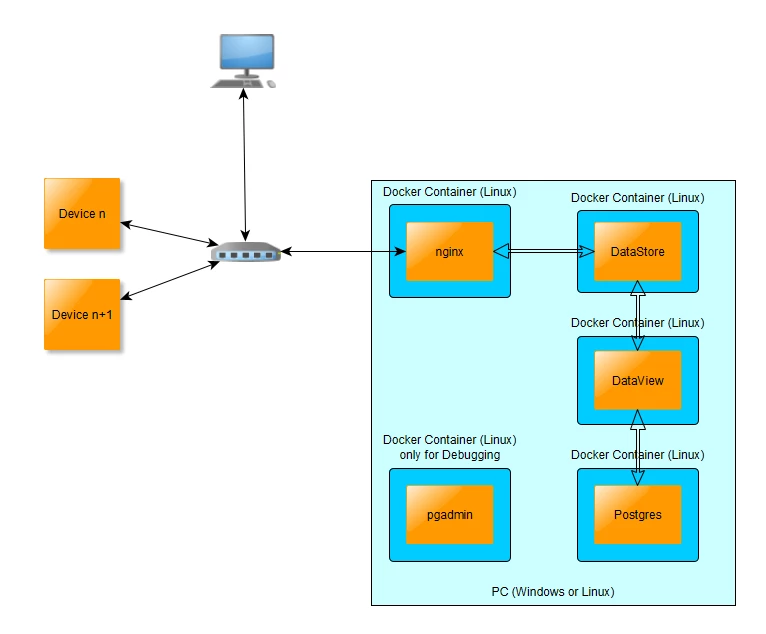
Software structure
-
The smartWARE Evaluation software consists essentially of 4 functional units (services):
-
Datastore
Stores the original data (Cold Data) sent by the Jupiter devices at intervals. -
Dataview
Prepares parts of the data (Cold Data) and stores them in the Postgres database (Warm Data). Receives user input from the browser application and provides the data to display the dashboard graphs/tables. -
Postgres database
This is where the so-called Warm Data is stored, i.e. the portion of the data that is used for quick display in the dashboards. -
Nginx (Reverse Proxy)
The http(s) interface of the services.
These services are developed as Linux Docker containers and are configured and started/stopped using Docker Compose. The data is displayed to the user via a web browser on any computer in the network.
Persistent data
All recorded data is persistently stored by the Datastore service in the Linux user's home directory:
~/smartWAREData/datastore
The data is stored in packed files, and protected from tampering by additional signed files. This entire data set is also referred to as Cold Data.
Deleting this directory or individual files from this directory will result in the loss of the recorded data unless a copy of the data was made!